Friday, April 29, 2011

Mint Blueberry Pie with Butter Almond Crust

I (Sierra) have an obsession with making pies, I do not know were this passion came from but all I want to do is create different and unique flavored pies! I would love to buy a food cart and walk around selling pies to create an income for myself. The only problem is that I would need a license, where I live is not very walkable, and I doubt that my pies are as wonderful as they could be in the future. Maybe one day you will encounter me selling unique flavored pies on the streets of a large city. Until then I shall continue to be a "pie maker".

All Butter Crust with Almonds:
2 cups all-purpose flour (I used whole wheat pastry flour because it is what I had on hand)
1/2 cup finely ground blanched almonds or almond flour
1 cup (2 sticks) unsalted butter (cut into 1/2 inch cubes & frozen)
1 teaspoon salt
1 heaping teaspoon brown sugar
6 to 8 tablespoons ice water

Combine the flour, almond flour, salt, and sugar in a food processor; pulse to mix. Add the butter and pulse until the mixture is course with pea sized clumps of butter. Add the water 1 Tbsp at a time while pulsing the mixture until it begins to clump together and hold.
Remove the dough and gently shape into two discs. Do not over-knead the dough. There will be small pieces of butter in the dough, which creates the flaky crust. Sprinkle a little flour over the discs and wrap them in plastic wrap or in an airtight container. Refrigerate for at least 1 hour.
Remove one of the dough discs from the fridge and let sit out for 5-10 minutes to soften. Roll out the dough with a rolling pin over a lightly floured surface to a 12 inch circle about 1/8 of an inch thick. Place the dough into a 9-inch pie pan and gently press the dough to line the bottom and sides of the pan. You can trim the extra dough that will hang over the edge.

Mint Blueberry Filling:
Preheat the oven to 400 degrees.

3 pints of blueberries (I used frozen because the fresh were very expensive)- you do not have to thaw them.
1/4 cup freshly squeezed lemon
1/2 cup sugar
1 tsp ground cinnamon
1/4 tsp nutmeg 
3 tsp minced mint or peppermint
1 tsp instant tapioca
1/2 cup flour

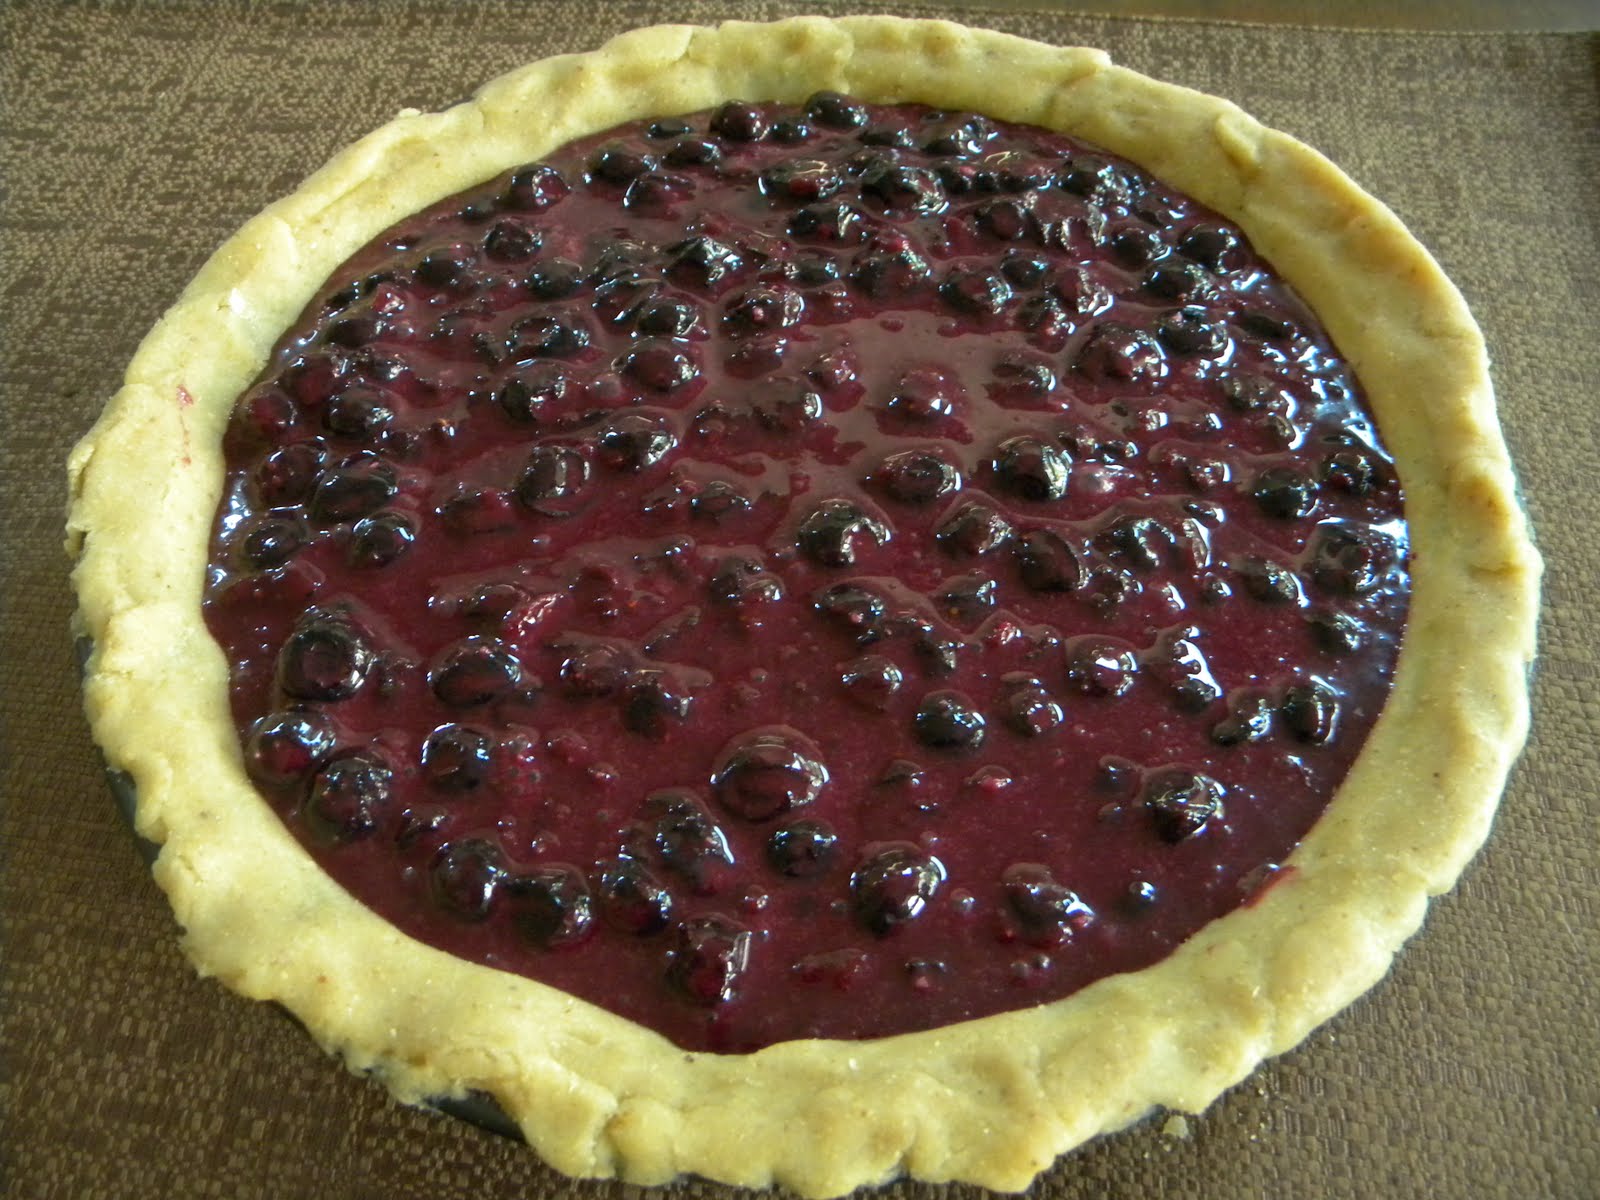
Place 1 pint of blueberries in a large sauce pan along with the lemon juice, sugar, cinnamon, nutmeg, mint, and tapioca. Place on medium heat until the mixture is a dark violet color or until the mixture bubbles. Continuously stir the mixture, then add the flour and stir for 2-3 minutes. Remove from heat and stir in the other 2 pints of blueberries. Spoon the filling into the unbaked pie shell. I decided to mince about 1/2 tsp of mint to scatter over the top of the pie once the filling was spooned in - since it was my first time making a pie with mint in it I wanted to be sure nothing would over power the minty flavor.


Remove the other disc of crust from the fridge and allow to soften for about 5 minutes, then roll out the dough. I chose to do a lattice crust since the pie contains quite a bit of liquid. To do this you cut the crust into long 1/2 inch strips. Then you place about 4 of the strips across the pie, leaving 1/2 inch spaces between each strip. Next you take a strip and weave in through the others in the other direction (over and under pattern) and you do this with about 3 more strips, then crimp the edges and you are done!
In my opinion the lattice pattern creates the most beautiful and professional looking pies and the juices from the pie will not bubble out with this technique.


Bake for about 30 minutes or until the crust begins to brown.
Allow to cool and then refrigerate.
Both the filling and the crust have a really nice flavor, the mint is a nice, light touch to the pie. Next time I will consider adding even more mint to give it a stronger flavor. I would consider this pie a success! Tres magnifique!

Tuesday, April 26, 2011

Mediterranean Pasta with Greens

If you are looking for a fresh and delicious pasta dish, this is definitely worth a try. The Mediterranean Pasta dish has been a favorite of ours from our very first try. This recipe comes from the cook book Clean Food by Terry Walters.

Ingrediants:
1 pound Penne or Fusilli
3 tablespoons Extra Virgin Olive Oil
3 Garlic cloves, minced
1 small Onion, chopped
1 tablespoon dried Basil
2 teaspoons dried Oregano
1 1/2 cups canned Chickpeas
2 cups canned diced Tomatoes with their liquid
2 tablespoons Tomato Paste
1/4 cup Mirin (sweet cooking sake)
1 small bunch Kale, chopped into bite-size pieces
Sea Salt and freshly ground Black Pepper (We like to use everyday seasoning from Trader Joes)
Chopped fresh Parsley for garnish

Directions:
Cook pasta according to directions on package. Rinse, drain, and return to the pot. Drizzle with one tablespoon olive oil and set aside.
In a large Dutch oven over medium heat, saute garlic and onion in 2 tablespoons olive oil until soft (about 3 min). Add basil, oregano, chickpeas, tomatoes, tomato paste, and mirin. Saute for 5 minutes longer. Add the kale, then cover and cook for 3 minutes or until soft. Uncover and stir to combine all ingredients. Season with salt and pepper and toss with the pasta. Cook to heat through, then garnish with parsley.

The dish is so fresh tasting, flavorful, and still light. It is a great alternative to your everyday pasta with red sauce and it provides greater health benefits as well!

Sunday, April 24, 2011

Ricotta Pancakes

This is another recipe from the cooking channels Extra Virgin and our first time testing this recipe out. They are a very light and fluffy pancake, with a unique light flavor from the ricotta. These would taste wonderful with blueberries mixed into the batter, orange zest, or almond extract.

Ingredients:
1/2 cup all-purpose Flour
1 tablespoon Sugar
Pinch of Kosher Salt
Zest of 1/2 Lemon
1 1/2 cups Ricotta Cheese
4 Eggs, Separated
Butter or cooking spray for the griddle

Heat a nonstick griddle to medium-high heat.
Mix together the flour, sugar, salt, lemon zest, ricotta, and yolks in a large bowl until thoroughly combined.
Beat the egg whites with an electric hand mixer in a separate bowl until stiff. Fold the egg whites into the ricotta mixture.
Spread some butter on the hot pancake griddle (or cooking spray).
Ladle 1/4-1/2 cup size pancakes onto the hot griddle and cook for about 2- 2 1/2 minutes per side, until golden.


You can keep the pancakes warm in a 200 degree oven/toaster oven before serving.

In place of syrup we heated up frozen fruit (we used raspberry-blueberry-blackberry mix) in a sauce pan and added sugar (or any sweetener you prefer) to taste.

"Fabulous fluffy deliciousness" - Penny       Bon Appetit!

Saturday, April 23, 2011

Banana Cream Pie with Hazelnut Crust

This recipe is compiled of three different recipes found online. This is a no-cook banana cream pie with a layer of chocolate, hazelnut crust, and a coconut cream topping (instead of whipped cream). Neither of us has ever made a banana cream pie, but it sounded good so we thought we would give it a try. While also making it one of a kind!
Now this pie was not made without any faults, we mistakenly used coconut milk with the pudding mix in the filling and then realized that the microscopic font on the base of the box said to use only real milk. So the consistency ended up being runnier and we had to store it in the freezer before serving.

Note that for the coconut cream topping the canned coconut must sit in the fridge for at least 4 hours!

Hazelnut Crust:
1 1/2 cup Whole Hazelnuts
4 Tbsp Butter (melted)
3 Tbsp Sugar

Directions:
Toast the hazelnuts in the oven for 10 minutes at 350 degrees. Cool slightly then rub the skins off with your fingers or a towel. Place the nuts in a food processor and pulse until coarsely chopped. Add the sugar and process until the nuts are finely chopped, but not greasy. Then combine the nut mixture with the melted butter and pat into the bottom of a 9" pie pan.
Bake at 350 degrees for 10 minutes. Allow to cool.

Now for the layer of chocolate:
2 (1 oz) squares of semisweet chocolate (we ended up using dark chocolate squares)
1 Tbsp Milk (we used coconut milk)
1 oz of Butter

Directions:
Fill the bottom of a sauce pan with water and place a glass bowl over it making sure that the bowl does not touch the water. Place on low heat and add the chocolate squares and the milk. Allow to partially melt and then add the butter. Make sure to continuously stir, once melted remove from the heat and continue to stir as it cools slightly. Then pour over the hazelnut crust and spread the chocolate evenly along the bottom and the sides.
This is the pie once we added the layer of bananas:

 Filling:
2 Bananas, sliced
1 1/2 cups cold Milk (Do not use coconut milk instead-we made this mistake)
1 (3.5 oz) package of Instant Vanilla Pudding

Directions:
Arrange the banana slices over the chocolate. Pour 1 1/2 cups milk into a large bowl. Add the pudding mix and beat with a whisk for 2 minutes. (the instant pudding we bought also wanted us to let it sit for 5 min and then whisk once again). Spoon over the banana slices and spread evenly.

Vegan Coconut Cream:
1 1/2 cups Full Fat Coconut Milk
1/3 cup Powdered Sugar (or to taste)
1-4 Tbsp Coconut Flour (or tapioca flour) Add 1 Tbsp at a time.(we ended up using only 2 Tbsp)
1 Tbsp Vanilla Extract to taste 

Directions:
Open the cans of coconut milk and transfer to a glass or metal bowl. Cover with a lid or plastic wrap and refrigerate at least 4 hours, or overnight.
Beat the thick coconut cream in the chilled bowl with a hand mixer until thick and fluffy. Gradually beat in the powdered sugar and coconut (or tapioca) flour, 1 or 2 Tbsp at a time testing for flavor and consistency. Use a rubber spatula to transfer onto the top of the banana cream pie.
We topped the pie with toasted flaked coconut (350 degrees for about 5 minutes).

The flavor of this pie turned out perfectly! Everyone enjoyed it even though the consistency was not up to par. The hazelnut crust adds a nice contrast to the sweeter pudding filling and the pudding begins to take on the banana flavor really well. And the coconut cream topping was a nice substitute for the typical sweet whipped topping. Overall this is a pie that we will make and share again!

Friday, April 15, 2011

Spinach and Ricotta Gnocchi


We got this recipe from Gabriele Corcos and Debi Mazar's show "Extra Virgin" on the cooking channel. It is a simple and delicous Gnocchi recipe, which could be considered healthier than your average Gnocchi because it there is no potato or flour and instead a lot of spinach!

Ingrediants:
  • 2 pounds fresh spinach (about 3 bunches)
  • 1 (16-ounce) container ricotta cheese
  • 6 tablespoons freshly grated Parmesan, plus more for serving
  • 2 egg yolks, lightly beaten
  • 4 tablespoons unsalted butter, plus more for the dish
  • Kosher salt and freshly ground black pepper
  • 2 handfuls fresh sage
Directions:
Preheat the oven to 350 degrees F.

Bring a large pot salted water to a boil.

Cut the stems off the spinach, and soak the leaves in the sink. Wash them thoroughly.

Add the spinach to the boiling water and cook 1 minute. Remove spinach from the water and plunge in a large bowl of ice water to stop the cooking.

Drain the spinach very well, and using a clean tea towel, squeeze out the extra water. Chop the leaves very fine.

Put the cooked spinach in a large bowl, add the ricotta, 3 tablespoons Parmesan, egg yolks, and season with a couple pinches salt and some freshly ground black pepper. Mix well, and make sure that the ricotta crumbles into fine pieces, and mixes properly with the spinach. Shape the mixture into balls about the size of walnuts.

Lightly butter a 13 by 9-inch casserole dish, lay all the gnocchi in it, and dress it with a few very thin slices butter and a sprinkling of Parmesan. Cook the gnocchi at 350 degrees F for about 20 minutes, and then use the broiler for the last 5 minutes to crisp and brown the top of the spinach balls.

In a medium skillet, melt the remaining 1 1/2 tablespoons butter (we added 1-2 tbl spoons olive oil/ which made more sauce), and saute the sage until it starts to brown. Serve the gnocchi on a warm plate and dress with the sage-butter sauce, and garnish with freshly grated Parmesan.
Not the most flattering picture, but they do taste wonderful!

Saturday, April 2, 2011

Coconut Lemongrass Soup

We have enjoyed this type of soup 2 or 3 times, but few restaurants prepare it...who knows why not, because it is so delicious. Lemongrass is one stop shopping for flavor, as it brings a lot of depth to dishes.

Ingredients:
2-4 cans of coconut milk(we used light)  (2 cans= 2-3 servings/ 4 cans= 4-6 servings)
2 stalks of lemongrass (Peel off dry-outer leaves, smash with a knife, cut into 1 inch pieces, then slice the pieces down the middle)
6 small carrots (peeled and chopped)
8 oz container of white button mushrooms
2 cloves of garlic (minced)
1 vegan veggie bouillon cube (we used low sodium Organic Gourmet)
1/2 of a large Kabocha squash (chopped into approx 1- inch pieces with skin on)
2 teaspoons Red curry paste

This is a Kabocha Squash:
 

In a Medium/Large pot combine all ingredients and simmer on low for about 30- minutes, then serve.
The lemongrass is edible, but sometimes is tough/chewy.  We recommend leaving it in the soup if you store leftovers in the fridge, which will allow the flavors to intensify.
The result is a creamy texture from the coconut & the Kabocha, but it is still light and flavorful!